Account Setup
Prerequisites Check
Before adding accounts to Cypht, ensure you have completed the essential setup steps. Account setup requires a fully functional Cypht installation.
Supported Account Types
Cypht supports multiple account types, allowing you to centralize various communication channels in one interface.
Adding Email Accounts
Configure your email accounts with the proper server settings and authentication credentials.
1. Access Account Settings
Navigate to Settings → Servers in the top navigation bar. Click "Add Account" to begin the configuration process.
2. Basic Account Information
Enter the essential details for your email account :
- Account Name : A descriptive name for identification (e.g., "Work Email", "Personal Gmail")
- Email Address : Your complete email address
- Display Name : Name that appears in sent messages
- Reply-to Address : Optional alternative reply address
3. Server Configuration
Configure the incoming and outgoing mail servers :
IMAP (Incoming)
- Server : imap.gmail.com (example)
- Port : 993 (SSL) or 143 (STARTTLS)
- Encryption : SSL/TLS recommended
- Username : Your full email address
- Password : Your account password
SMTP (Outgoing)
- Server : smtp.gmail.com (example)
- Port : 587 (STARTTLS) or 465 (SSL)
- Encryption : STARTTLS recommended
- Authentication : Required
- Username : Same as IMAP
Security & Authentication
Modern email services often require additional security measures for third-party applications.
App-Specific Passwords
Many providers (Google, Microsoft, Yahoo) require app-specific passwords instead of your regular password :
Gmail OAuth
OAuth2 lets your users connect their Gmail account without ever typing their Google password, and without app passwords. Cypht receives a token it can refresh, which can be revoked at any time from the Google account.
The setup happens in the Google Cloud Console : create a project, configure the consent screen, generate an OAuth
client, then copy the two resulting values into your Cypht .env file.
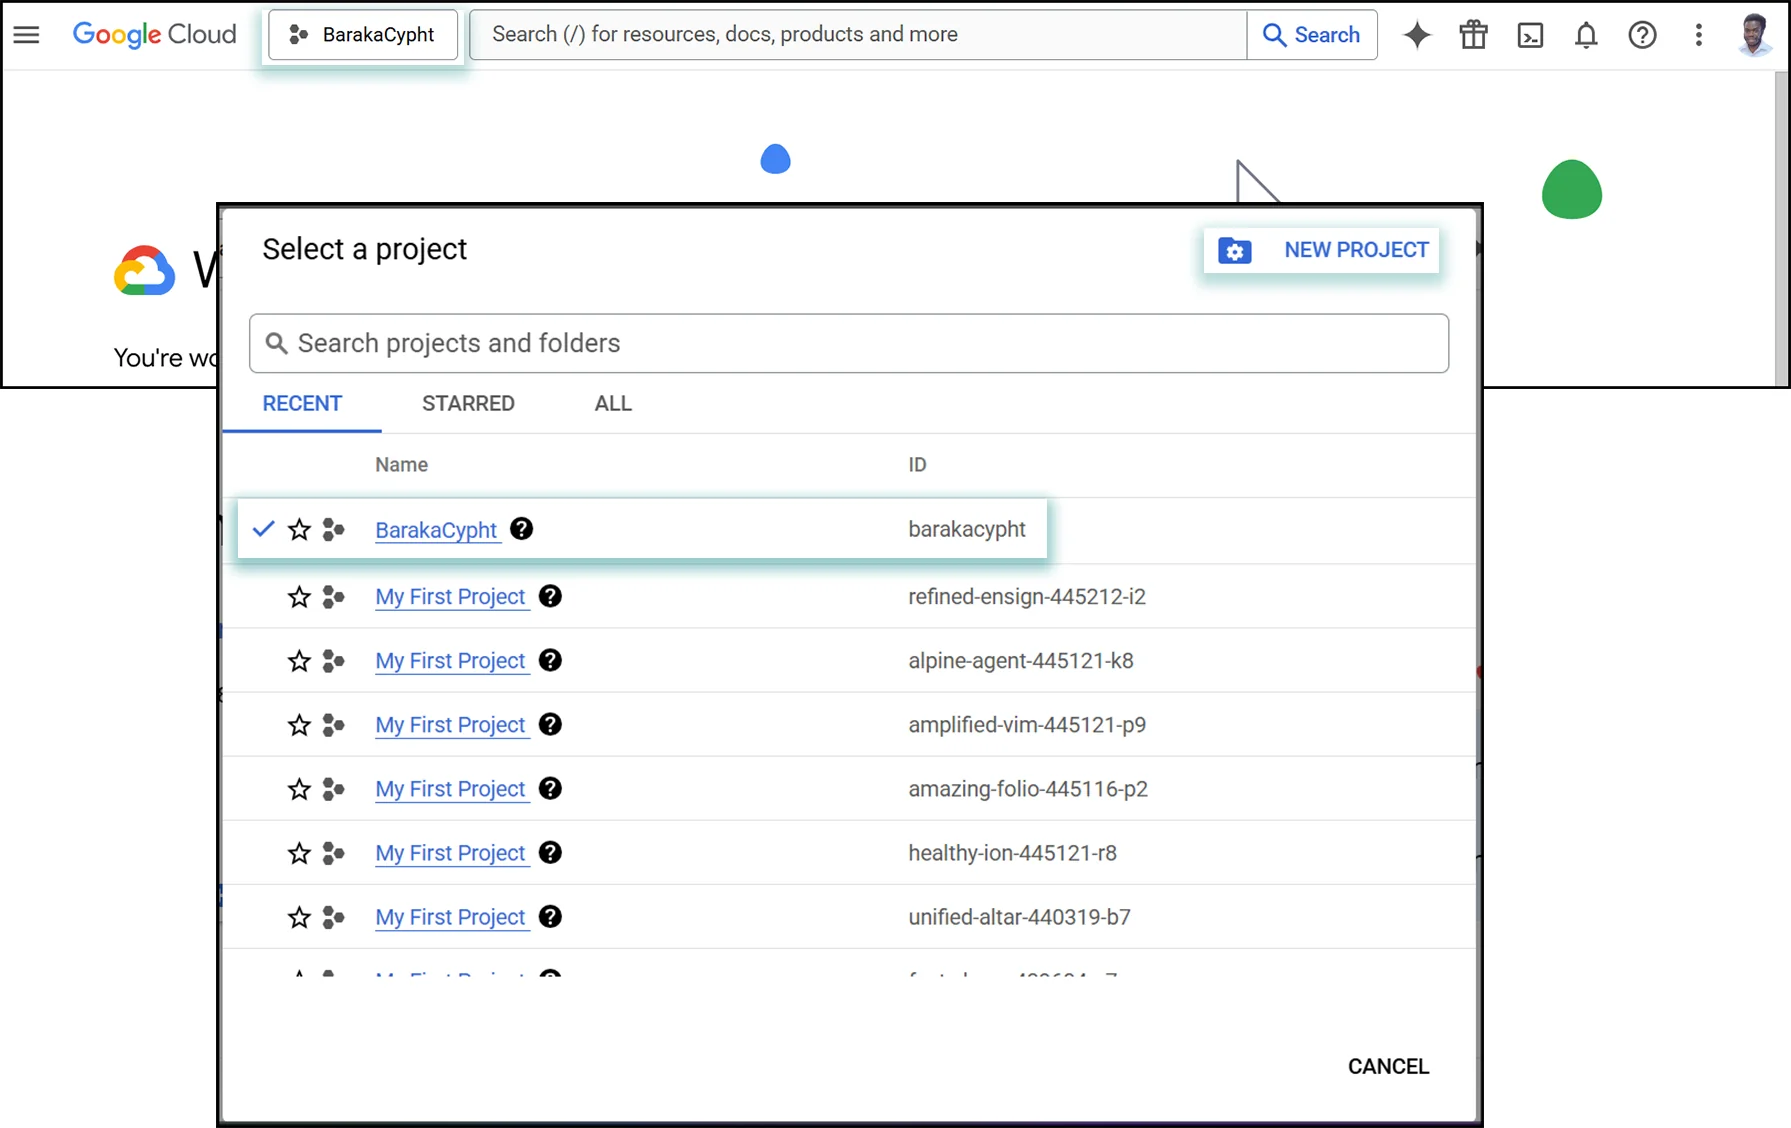
1. Create a Google Cloud project
- Visit the Google Cloud Console.
- Sign in with the Google account that manages your application.
- If you do not have a project yet, choose Create Project and give it a name.
- If a project already exists, select it from the project list.
The project selector sits in the top bar of the console :
2. Configure the OAuth consent screen
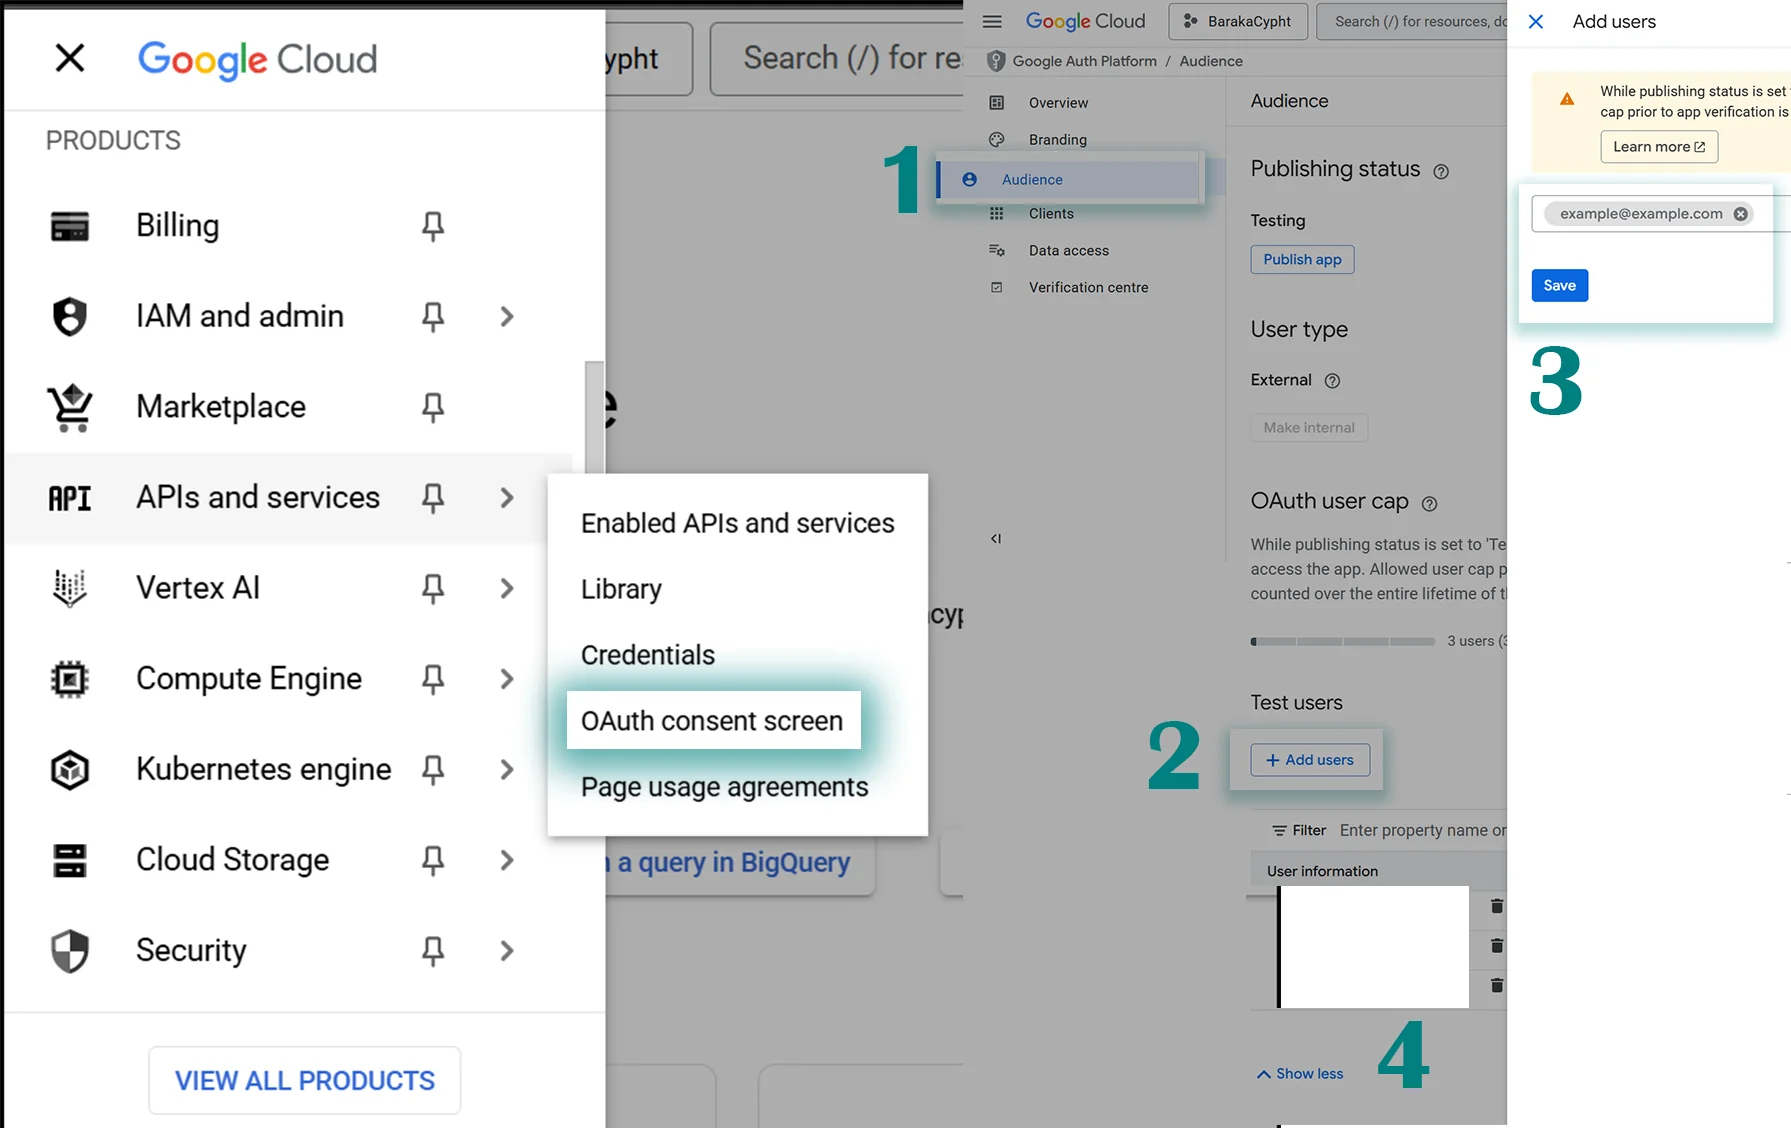
The consent screen is what your users see when they authorize Cypht to read their mailbox. Navigate to APIs & Services > OAuth consent screen, then provide :
- The application type External or Internal, depending on your needs.
- The application name displayed to users.
- Support and administrative contact email addresses.
- Your authorized domains (for example
yourdomain.com, orlocalhostfor development). - A privacy policy URL if you have one.
Save your changes and continue, then add the accounts allowed to use the application while it is in test mode :
- In the same OAuth consent screen, open the Test users tab.
- Select Add users.
- Enter the email addresses allowed to use the application during testing.
- Confirm to display the list of authorized test accounts.
The consent screen and its test users tab :
3. Create the OAuth credentials
- Return to APIs & Services and choose Credentials.
- Select Create credentials > OAuth client ID.
- Set the application type to Web application.
- Name the client, for example "Cypht – Gmail Authentication".
- Define the authorized redirect URIs, then click Create.
The application type (1), the client name (2) and the authorized redirect URI (3) :
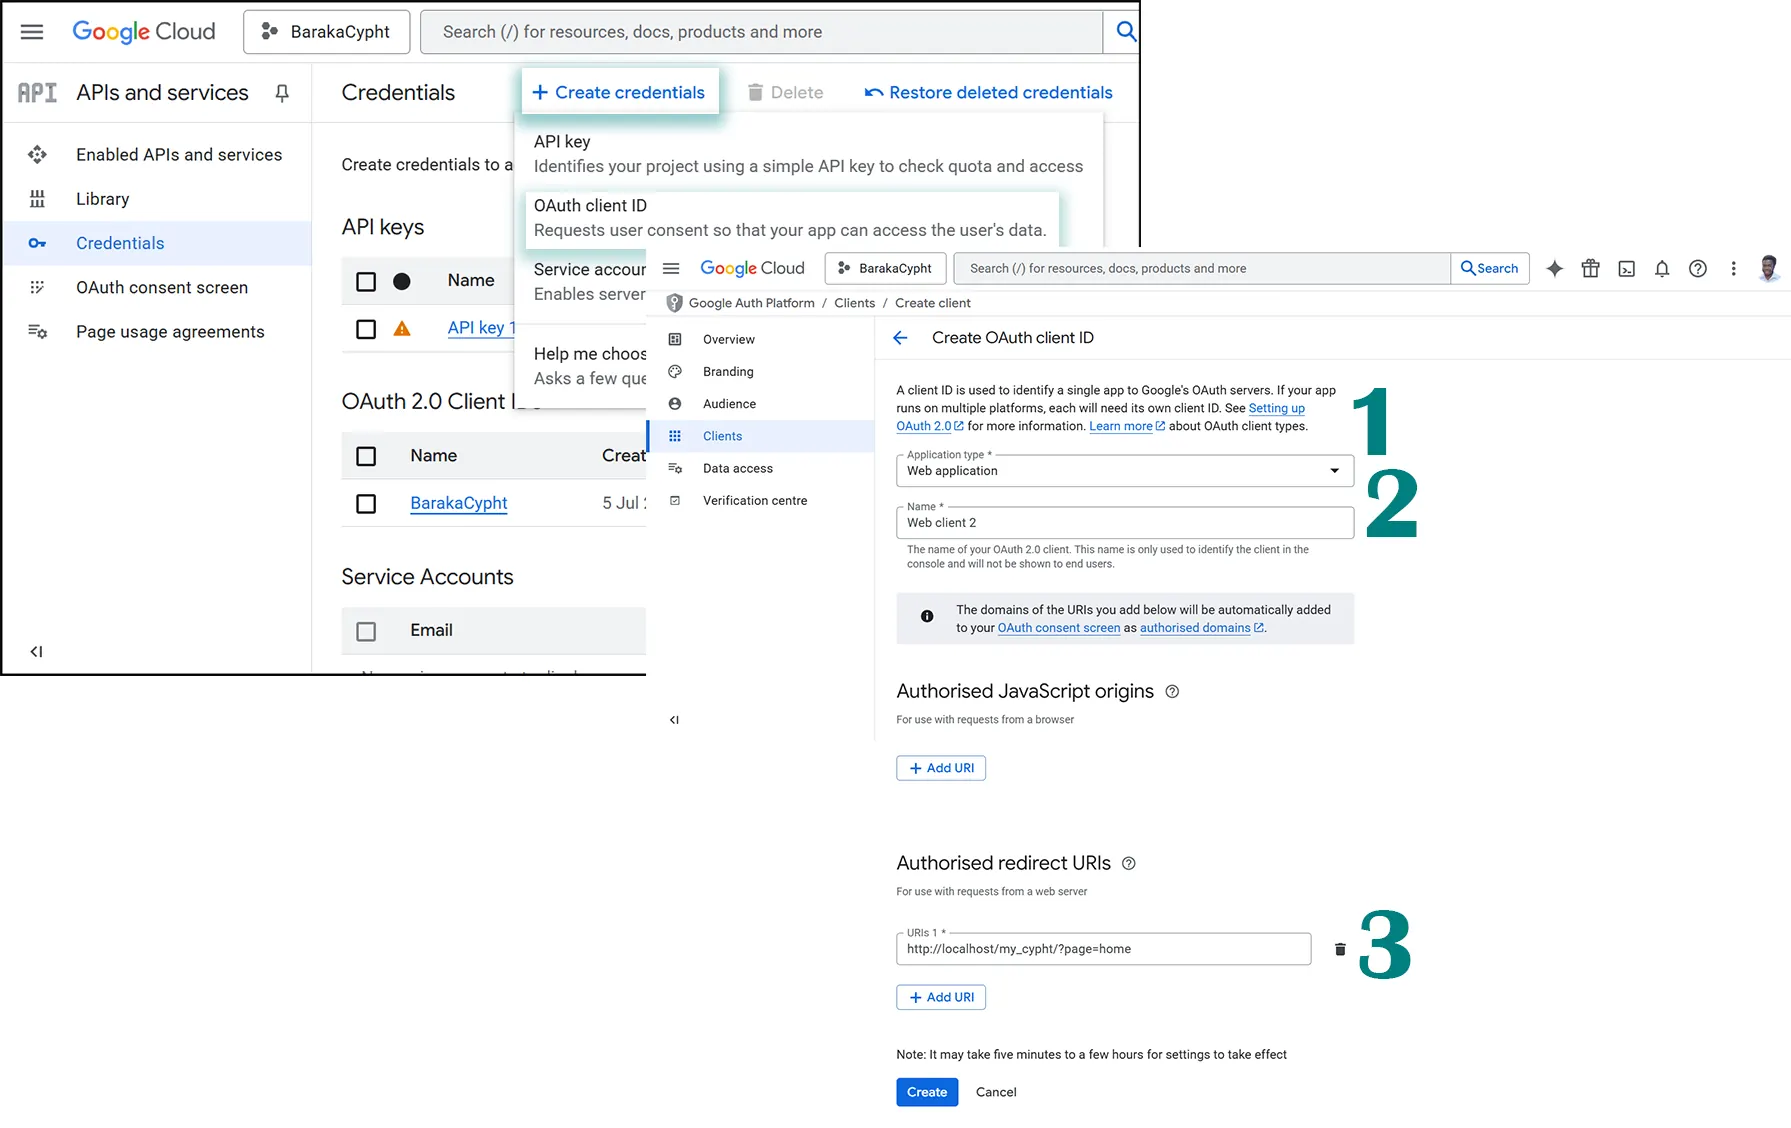
The redirect URI is the address of your Cypht instance. Adjust the host and path to your installation :
# Development
http://localhost/my_cypht/?page=home

# Production
https://yourdomain.com/?page=home4. Set the variables in .env
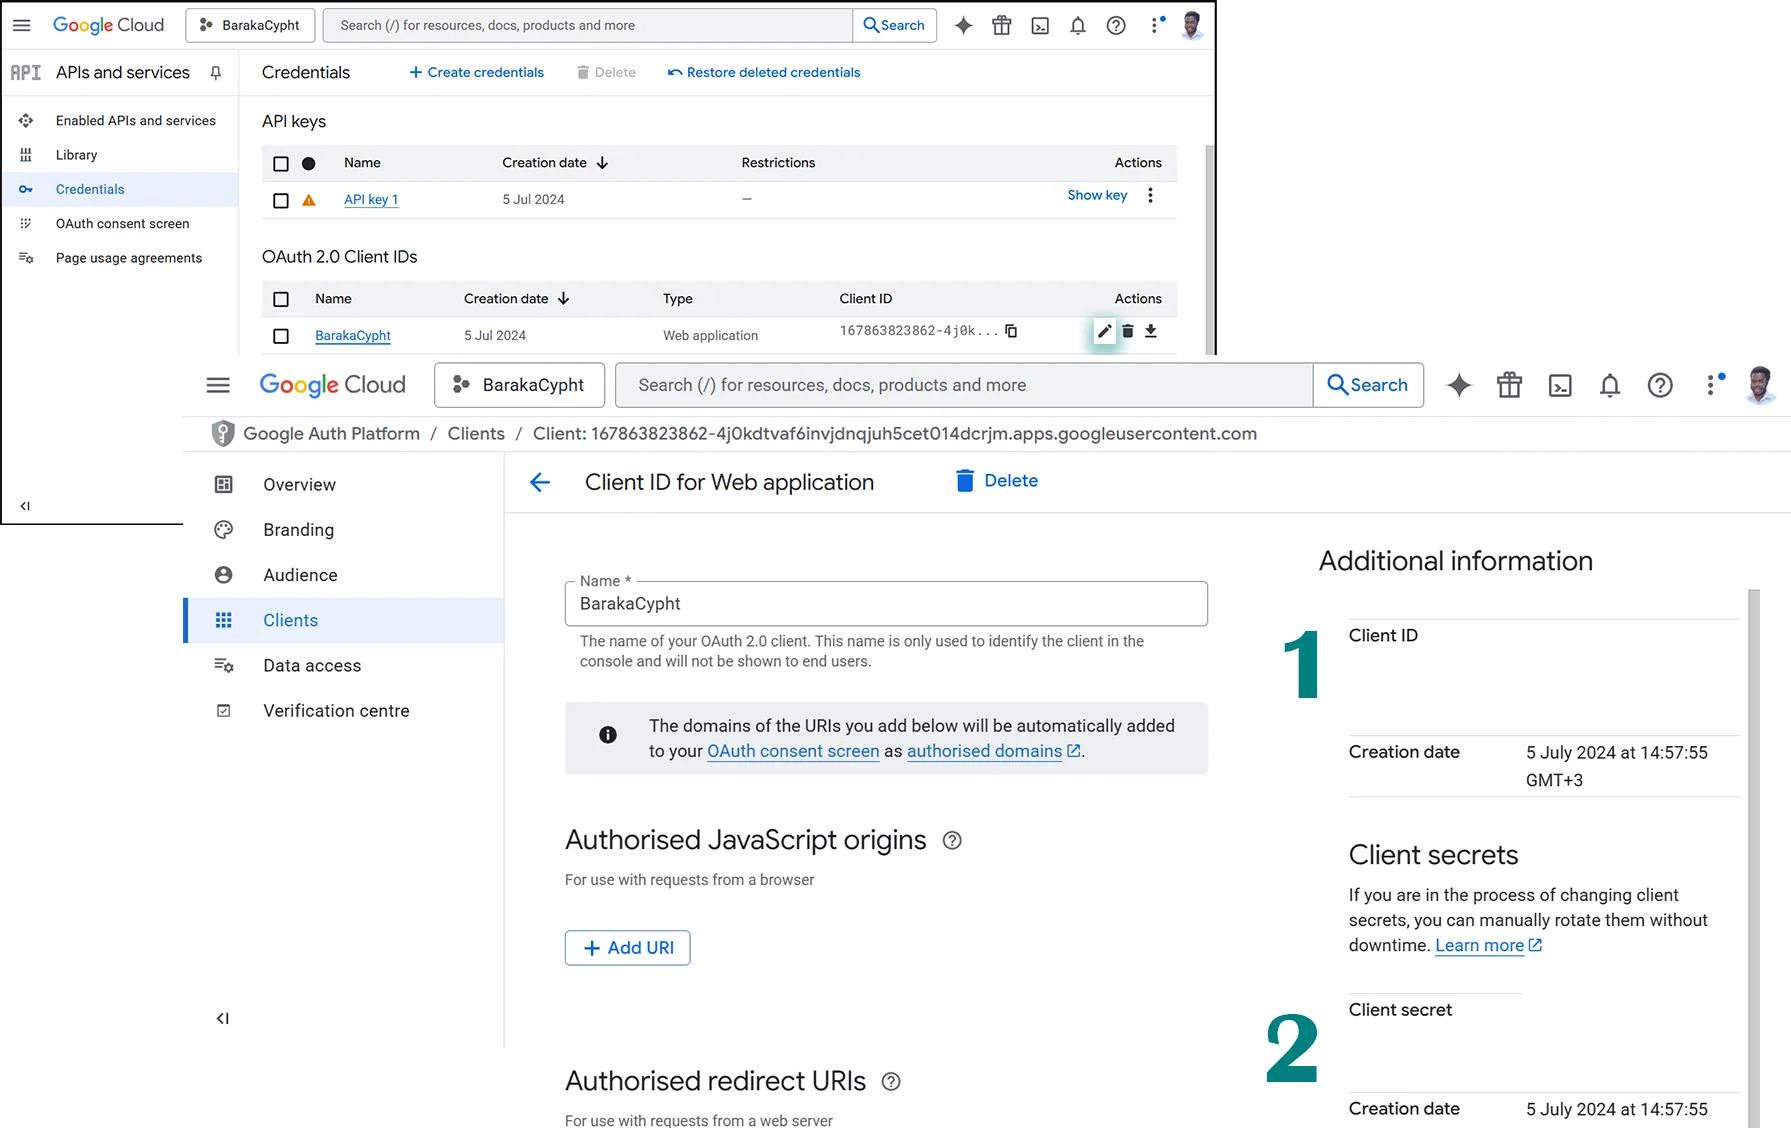
Once the client is created, Google displays the two values Cypht needs :
- Client ID (1) this becomes your
GMAIL_CLIENT_ID. - Client secret (2) this becomes your
GMAIL_CLIENT_SECRET.
Open the .env file at the root of your Cypht project and fill in both variables :
GMAIL_CLIENT_ID=<client-id>
GMAIL_CLIENT_SECRET=<client-secret>
Both values are shown right after the client is created :
Your configuration is now complete : users can add their Gmail account from Cypht and authorize it through Google.
Outlook & Office 365 OAuth
Outlook.com and Office 365 accounts authenticate through the same Microsoft identity platform, so a single application registration in the Azure portal covers both.
You register an application, note its client ID, create a client secret, then copy both values into your Cypht .env
file.
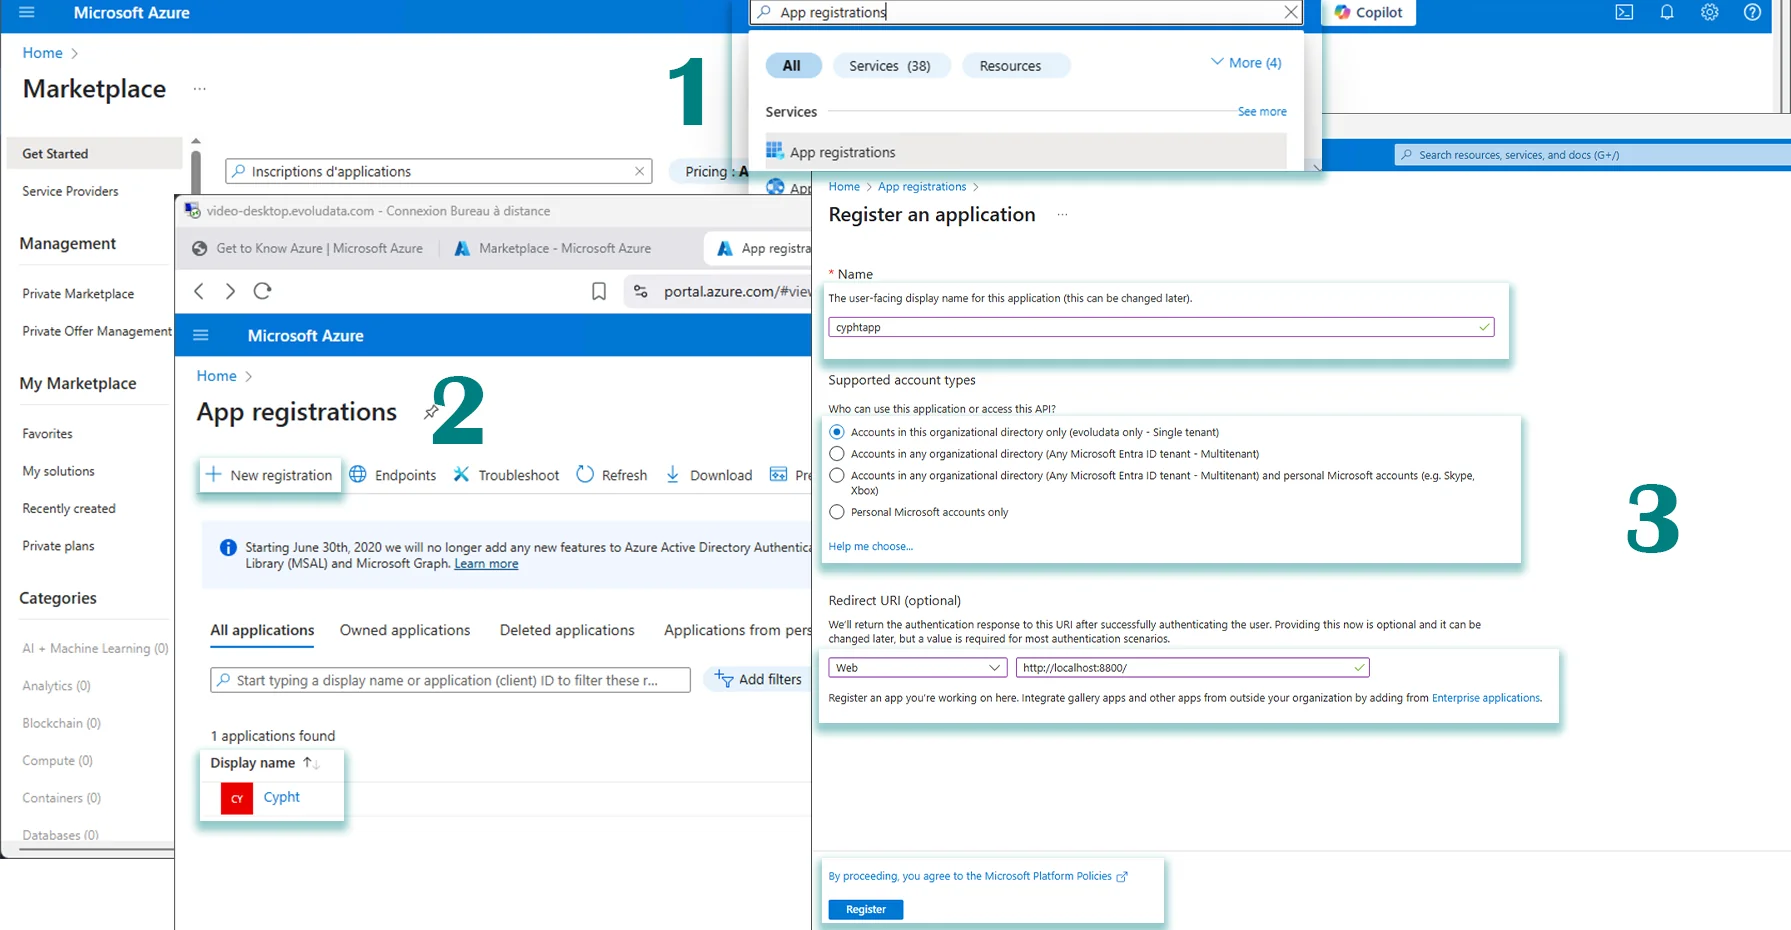
1. Register the application
- Go to the Azure portal and sign in with the Outlook account associated with your app.
- In the search bar at the top, type App registrations and select the matching service.
- If you already have an application, select it from the list.
- Otherwise click + New registration, name your application, set the supported account types and the redirect URIs if needed, then click Register.
The app registrations service in the Azure portal :
2. Get the client ID
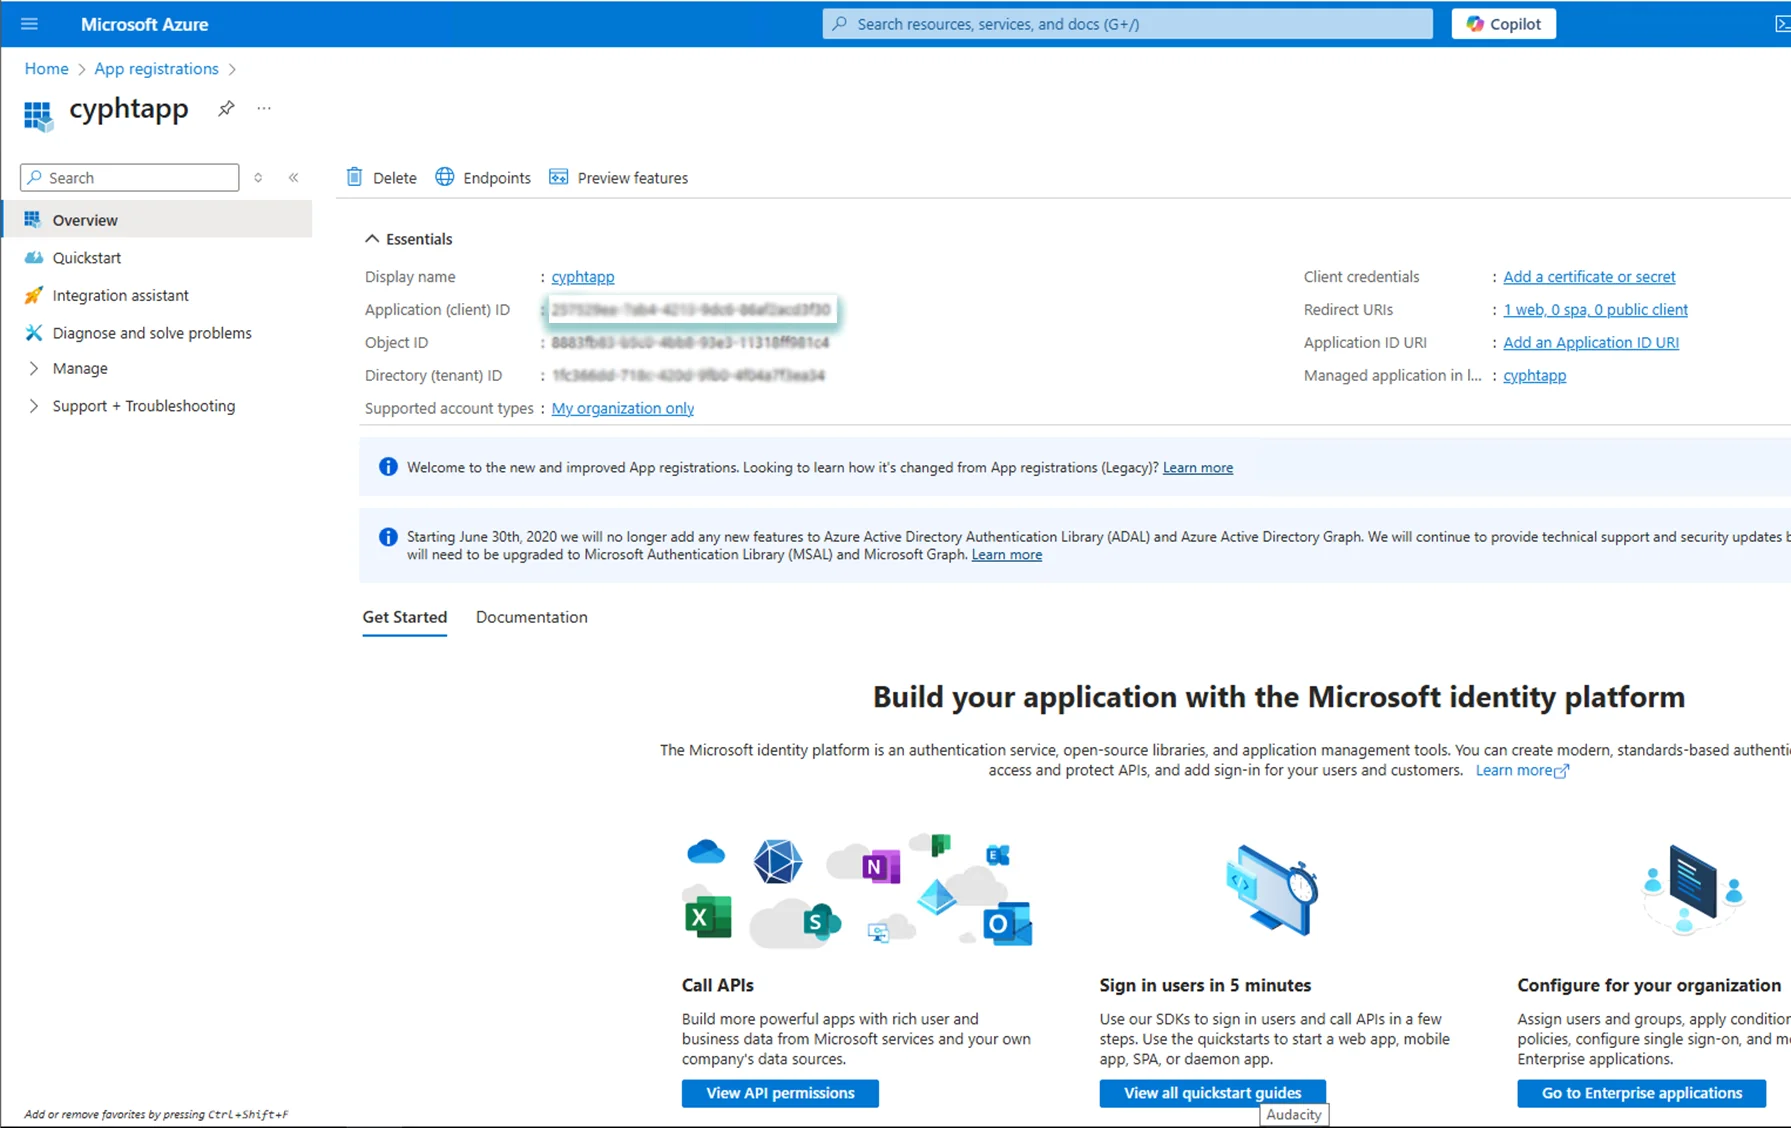
- Once the application is registered or selected, you land on its Overview page.
- The Application (client) ID is displayed there. Note it down : it becomes
OUTLOOK_CLIENT_IDorOFFICE365_CLIENT_ID.
The client ID on the application overview page :
3. Create the client secret
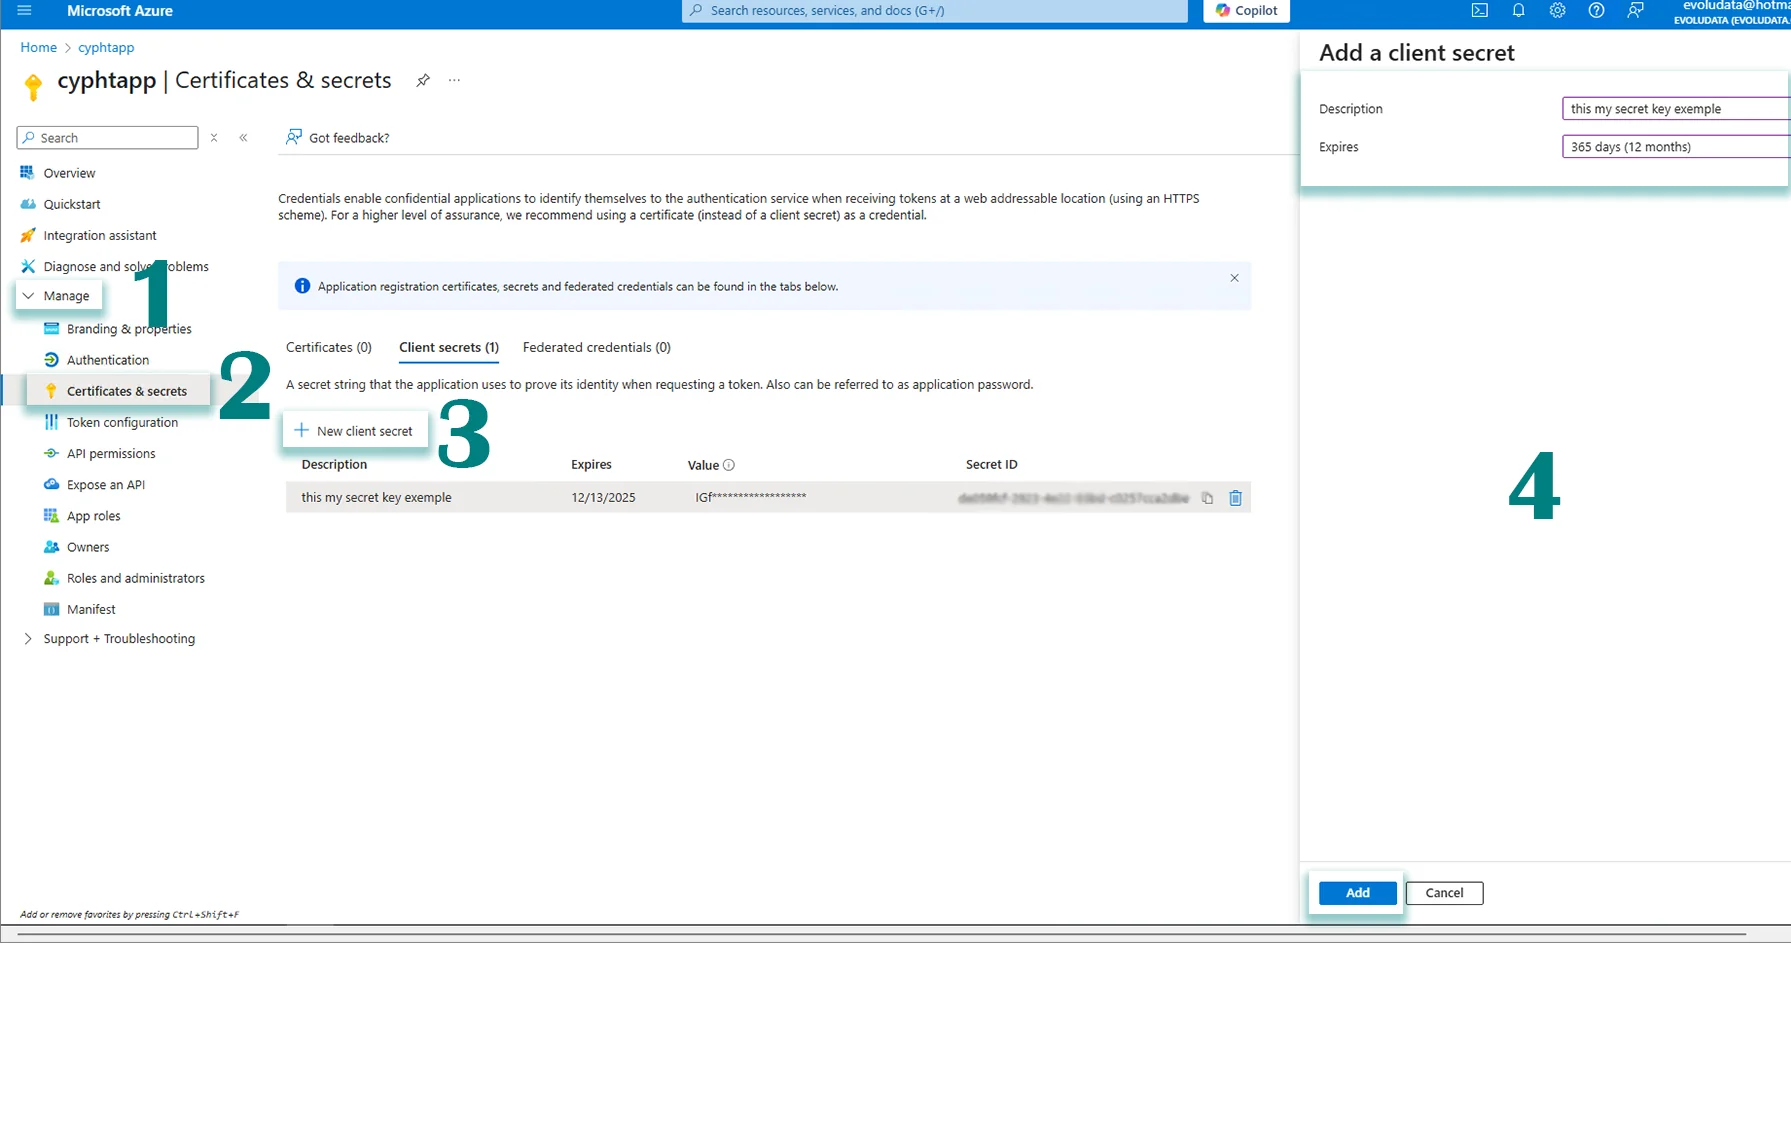
- In the left menu of your application page, under Manage, select Certificates & secrets.
- In the Client secrets section, click + New client secret.
- Add a description and choose a validity period 1 or 2 years, for example.
- Click Add.
The Certificates & secrets screen where the secret is created :
4. Set the variables in .env
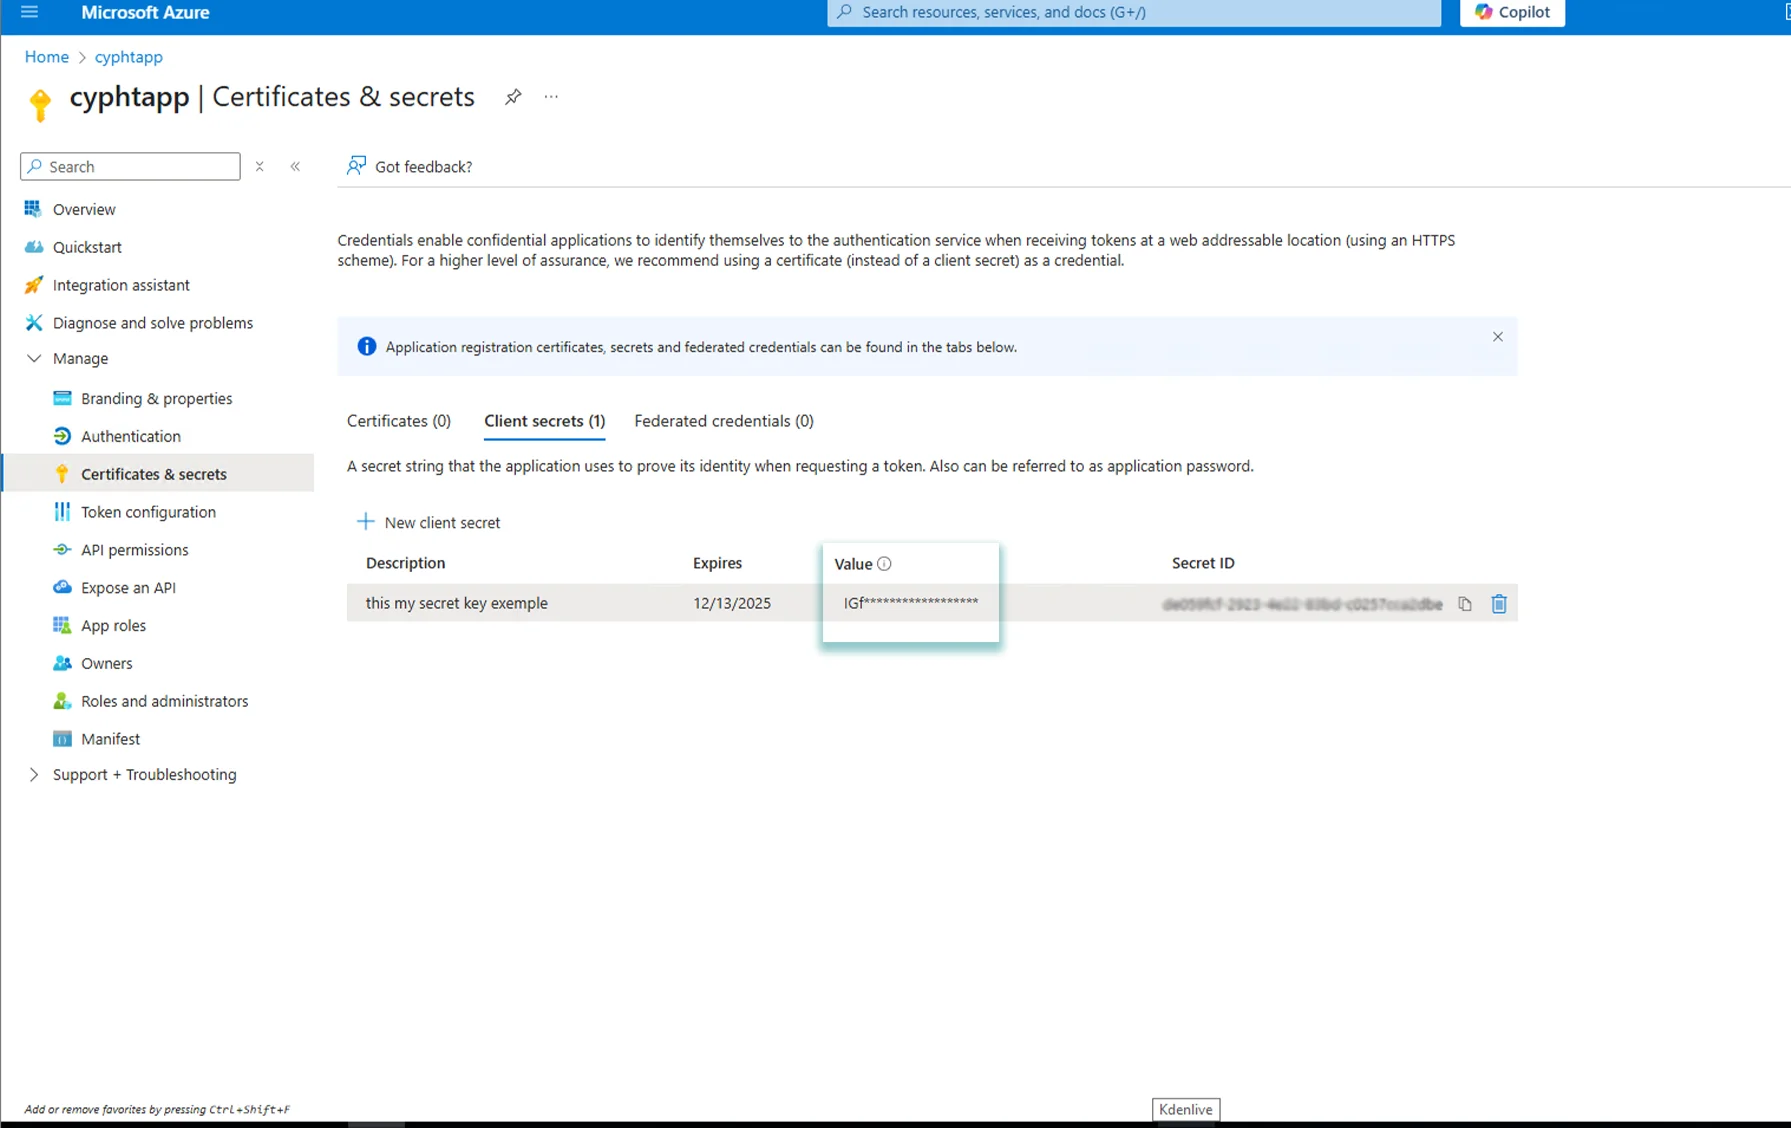
You now have both values : the client ID (1) from the overview page, and the client secret (2) you just created.
Open the .env file at the root of your Cypht project and fill in the pair matching your provider :
# Outlook.com
OUTLOOK_CLIENT_ID=<client-id>
OUTLOOK_CLIENT_SECRET=<client-secret>

# Office 365
OFFICE365_CLIENT_ID=<client-id>
OFFICE365_CLIENT_SECRET=<client-secret>
The client secret value, displayed once after creation :
Your configuration is now complete : users can add their Outlook or Office 365 account from Cypht and authorize it through Microsoft.
Adding RSS/Atom Feeds
Transform your favorite content sources into readable message threads within Cypht.
Feed Configuration
- Click Settings → Accounts → Add Account
- Select "RSS/Atom Feed" as account type
- Enter the Feed URL (e.g., https://example.com/feed.xml)
- Choose a Display Name for the feed
- Set Update Frequency (hourly, daily, manual)
- Click Test Connection to verify the feed
- Save and the feed will appear in your folder list
Advanced Settings
Fine-tune your account configuration for optimal performance and functionality.
- Folder Prefix : Specify IMAP folder prefix (INBOX., etc.) for server compatibility
- Connection Limits : Set maximum concurrent connections to prevent server overload
- Message Limits : Configure how many messages to sync per folder
- Signature Management : Create and manage email signatures per account
- Notification Settings : Configure desktop or email notifications for new messages
Troubleshooting Common Issues
Resolve common account setup issues with these solutions.
On this page